Posts

Recording the iPhone screen and Mac screen at the same time in one video

Image
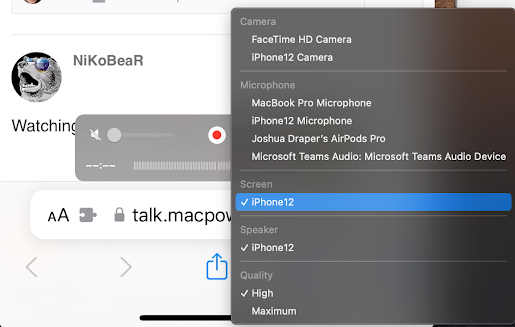
 I was browsing the Mac Power Users forum when I ran across this question : "I’m trying to figure out a way to record a demo of my web-based software simultaneously recording a desktop view and a mobile view. I basically want to use and interact with one browser window and have another browser window showing the same thing but with a mobile view. Thoughts?" I use QuickTime Player.  Connect your iPhone/iPad to your Mac with a lightning cable and start a New Movie Recording.  Pick your iPhone/iPad screen as the video source by clicking the little drop down arrow next to the red recording button.   You will get a window showing the contents of your device's screen.  There is no need to actually start recording this video. Leave that window open and start a New Screen Recording in QuickTime player at the same time.  Then just arrange your iPhone window and browser window on your screen and start recording.  You will see both things at the same time.  I uploaded a small video

Opening Microsoft Teams meeting links directly in Teams instead of opening Safari first on the Mac

There is a free, open source utility called Finicky that you can set as the default browser on your Mac and then configure to open certain links in certain browsers. I use it to make Teams launch directly when I click on Teams meeting links instead of first opening Safari and then opening Teams. You can install it from the site linked above or with homebrew with the following command: brew cask install finicky After installing it, save a text file called .finicky.js in your home directory. That period at the beginning of the filename needs to be there. Add the content below to make Teams open directly when you click on a Teams meeting link in any program. You can change the "Safari" on the defaultBrowser line to whatever your default browser is. /** * Save as ~/.finicky.js */ module.exports = { defaultBrowser: "Safari", rewrite: [ { match: /teams.microsoft.com\/l\/meetup-join\//, url: { protocol: "msteams" } } ], handlers: [ { match

Clean Install of Mojave on 2018 MacBook Pro

long story.. Disk Utility partition lead to second container disk that looked wrong, so went into terminal and used diskutil eraseDisk to erase the whole disk and use APFS. That looked fine.  Had troubles with the network recovery.  Important content could not be downloaded so I wanted to boot from USB installer for Mojave, but I could not.  tried to use startup security utility, but since I had erased the drive, there was no admin password and so startup security utility would not run. I plugged in the USB drive and disk utility recognized it.  In terminal, I navigated to /Volumes/Install Mojave..../Contents/MacOS and ran InstallAssistant in the background.  That seems to have worked so far. After restart, everything was fine.

MacOS Folder Action to watermark images using ImageMagick 6 for posting on Facebook

Image
I wanted to prepare images to be posted on Facebook which means I needed to resize them to 1200x600 pixels and overlay a watermark.  I also want to keep a local copy of the image I post, so I decided to automate the image manipulations with a folder action and GraphicsMagick 1.3, which is available in MacPorts.  This is tested in Mojave and Catalina, but should work on most version of MacOS and OS X NOTE: My solution modifies the image that is saved in the folder and makes no backup copies. It also creates a temporary file called "wm" in the watched folder, then deletes it. Folder actions are performed on all new files that are put into a certain folder.  I created a new folder action in Automator with one action called "Run Shell Script".  In the top-right corner, I told Automator to pass the files as arguments to the script.  The script itself is shown below: for f in "$@" do dname = $( dirname "$f" ) /opt/local/bin/gm mogrify &quo

Convert WebVTT file to SRT format (VTT to SRT)

Lately, I have been creating lots of how-to videos for my colleagues at work.  I like to include subtitles since some people may prefer to read the words I am saying.  We use Microsoft Stream to host the videos since it is part of our Office 365 subscription. One of the great things about Microsoft Stream is that it will automatically generate captions (subtitles) from the audio in the video file.  You can edit the captions right in the web interface as you watch the video.  Microsoft did a great job on this user experience. Today, I needed to burn the subtitles into the video because of limitations of the customers computers.    Handbrake does this well, but it does not understand the WebVTT format.  There are several online converters, but I do not like giving my content to unknown internet services, so I starting learning about the difference between the formats.  JBI Studios have a very helpful explanation about the differences.  I was able to use it to develop the commands to

Adding PPD printer driver to macOS 10.15 Catalina

When trying to add an Océ Plot Wave 550 wide-format printer to my new Catalina install on my MacBook Pro, I discovered that I could not add the PPD file like I always could before.  I could select Other... for the driver and navigate to the folder containing the PPD file, but all the files were grey and could not be selected. I discovered that the following location had a bunch of gzipped printer PPD files in it: /Library/Printers/PPDs/Contents/Resources So I copied the ocpw5505.ppd file that I needed to "Oce PlotWave 550" and gzipped it to get "Oce PlotWave 550.gz".  Then I copied it to /Library/Printers/PPDs/Contents/Resources When I tried to add the printer again, I chose Select Software... and the Oce PlotWave 550 was there in the list.  I selected it, and everything worked fine. * Essential notes: Use the Line Printing Daemon and make sure the Queue value is not blank.

Presenting "Streamlining Batch Link" at XCON 2019, Bluebeam annual user conference

Image
I was lucky enough to be selected as a presenter at Bluebeam's annual user conference, XCON, in 2019.  My presentation was titled "Streamlining Batch Link" and described a way to take advantage of the way Batch Link works in Bluebeam Revu to greatly speed things up.  If you are not familiar with Batch Link, then I suggest you watch Bluebeam's video about it below, otherwise you can skip it. In my presentation, I showed some screenshots of some scripts I used in Powershell.  I want to make those scripts available to everyone with this post. You can download the presentation slide deck from this link , but most of the explanation was verbal so you will probably want to read the short synopsis below or watch the video on YouTube .  Most of the presentation is about exactly how to make the concept work. If you are a text junky like me, here is the basic concept: You can use a 1-page blank pdf file to stand-in for a real document or drawing for the purposes of